.gif)

Configure Gmail with Microsoft Outlook 2003
Microsoft Outlook
This video illustrating how to configure microsoft outlook 2003,A step by step guide to set up microsoft outlook express to retrieve your email messages from the Internet.
how-to how to gmail instructions configure microsoft outlook 2003 microsoftoutlook2003 configuration videos restore emails outlook express pst dbx repair lost email find messages missing how-to how to gmail instructions configure microsoft outlook 2003 microsoftoutlook2003 configuration videos Outlook PST backup, Maura Thomas, productivity
How to backup and restore Microsoft Outlook PST files
Microsoft Outlook
This video illustrating how to keep your Outlook data safe in the event of a computer software or hardware malfunction.
restore emails outlook express pst dbx repair lost email find messages missing how-to how to gmail instructions configure microsoft outlook 2003 microsoftoutlook2003 configuration videos Outlook PST backup, Maura Thomas, productivity
Step to take backup of all Outlook Express data
Taking Backup of the Outlook Express mails, address book, and the account information manually is not an easy task. Windows XP provides a built-in tool, by which we can take Outlook Express data backup. It is the Files and Settings Transfer Wizard.
The main steps for taking backup of Outlook Express data Using Files and Settings Transfer Wizard are as follows.
1. open Run dialog in Start.
2. Type MIGWIZ.EXE in Run dialog. This will open the Files and Settings Transfer Wizard.
3. Click the Next button.
4. Select Old computer option, and click Next button.
5. select the location where the data will be stored. Click Next button.
6. Select the option Both files and settings in this dialog box. Also, select the Let me select a custom list of files option.
7. Remove all the other entries except Outlook Express. Click Next button.
now whole prosess is completed and Outlook Express data is now backed up.
See The video here
System Restore is a tool of Windows XP Professional that you can use to restore your computer to a previous state, if a problem occurs, without losing your personal data files like Microsoft Word documents, browsing history, drawings, favorites, or e-mail. System Restore tool monitors changes to the system and some application files, and it automatically creates easily identified restore points. These restore points allow you to revert your system to a previous time. They are created daily and at the time of any system events like when any application or driver is installed. You can also create and name your own restore points at any time.
How create system restore point manually .See Here
Before you open the System Restore console, you may want to save your work and close all programs since System Restore requires you to restart your computer.
After restart your computer follow these steps :-
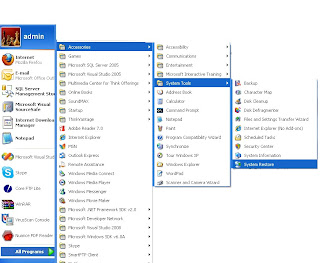
• Click Start.
• Point to All Programs.
• Point to Accessories.
• Point to System Tools.
• Click System Restore.
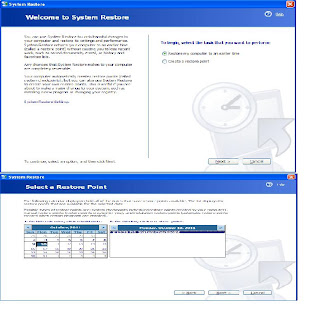
From the Welcome to System Restore screen of the System Restore Wizard select Restore my computer to an earlier time. Then select the date you created the restore point from the calendar in the Select a Restore Point screen. All of the restore points you created and you computer created on the selected date are listed by name in the list box to the right of the calendar.select one of them and click next.
Step By Step Video for system restore
Note: System Restore does not replace the process of uninstalling a program. To completely remove the files installed by a program, you must remove the program using Add or Remove Programs in Control Panel or the program's own uninstall program. To open Add or Remove Programs, click Start, click Control Panel, and then click Add or Remove Programs.
How create system restore point manually .See Here
Before you open the System Restore console, you may want to save your work and close all programs since System Restore requires you to restart your computer.
After restart your computer follow these steps :-
• Click Start.
• Point to All Programs.
• Point to Accessories.
• Point to System Tools.
• Click System Restore.

From the Welcome to System Restore screen of the System Restore Wizard select Restore my computer to an earlier time. Then select the date you created the restore point from the calendar in the Select a Restore Point screen. All of the restore points you created and you computer created on the selected date are listed by name in the list box to the right of the calendar.select one of them and click next.

Step By Step Video for system restore
Note: System Restore does not replace the process of uninstalling a program. To completely remove the files installed by a program, you must remove the program using Add or Remove Programs in Control Panel or the program's own uninstall program. To open Add or Remove Programs, click Start, click Control Panel, and then click Add or Remove Programs.
In this article we learn how to use the System Restore tool to return your computer to a previous state. System Restore takes a "snapshots" of critical system files and some program files and registry settings and stores this information as restore points. If your computer is not functioning correctly, you can use these restore points to return Windows XP to a previous state when your computer was functioning correctly.
Click Start->All Programs-> Accessories-> System Tools ->System Restore.
For Classic Start Menu: Click Start-> Programs-> Accessories-> System Tools-> System Restore.
Click Create a restore point, and then click Next.
In the Restore point description box, type a name to identify this restore point. System Restore automatically adds to this name the date and time that this Restore Point is created.
To finish creating this restore point, click Create.
See Video Here
Note:-System Restore does not affect personal files, such as e-mail, documents, or photos. You can only restore files that you have deleted if you have made backups of those files. To perform the System Restore, you must be logged on to Windows as an administrator.
Click Start->All Programs-> Accessories-> System Tools ->System Restore.
For Classic Start Menu: Click Start-> Programs-> Accessories-> System Tools-> System Restore.
Click Create a restore point, and then click Next.
In the Restore point description box, type a name to identify this restore point. System Restore automatically adds to this name the date and time that this Restore Point is created.
To finish creating this restore point, click Create.
You can also launch System Restore window by typing the command below, in the RUN box:
%SystemRoot%\System32\restore\rstrui.exe
See Video Here
Note:-System Restore does not affect personal files, such as e-mail, documents, or photos. You can only restore files that you have deleted if you have made backups of those files. To perform the System Restore, you must be logged on to Windows as an administrator.
There are a lot of ways to prints a document, but you can print a document quickly if you put a shortcut to the printer on your desktop and drag a document icon to it, no need to open file for printing just drag a file to printer icon and get your print.
To do this, first click Start button, Settings, then Printers ( first make sure you installed your printer driver). When the Printers window opens, hold down Ctrl and drag the printer icon to your system desktop.
Now you can drag a document icon and drop it in printer icon on your desktop. Here you will get a print quickly and without open a file.

